Shaker Single-Drawer Cupboard. Part 3.
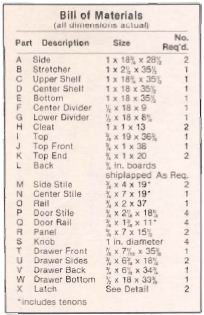
The back boards (parts L) can now be cut to size and rabbeted lengthwise as shown. A pair of cut nails spaced about 2 in. apart are driven into the back edge of parts C, D, and E.
Next, the front frame (parts M, N, and O) is made. The tenons on the bottom end of parts M and N are best cut using the table saw and dado head. Refer to the tenon detail for all dimensions. Once the tenons are cut, lay out and mark the location of the mortises. When making the mortises, you’ll find that most of the waste stock can be removed by cutting a series of holes using a 3/4 in. diameter drill bit. When drilling though, be sure to keep the bit square to the edge so that later, when the frame is assembled, the tenons will fit snugly in the mortises. After the holes are drilled, the remaining waste stock can be cleaned up with a sharp hand chisel.
Dry assemble parts M and N to part О using pipe clamps to hold them together. Bore the 1/8, in, diameter pin holes, then remove the clamps and separate the parts. Now, use a small round file to elongate the holes as shown. Reassemble the parts, then apply glue to the 1/8, in. dowel pins and drive them in place. Only the pins are glued — not the mortise and tenon joint.
The frame can now be joined to the carcase. Apply a thin coat of glue to the mating surfaces on the front edge of parts A, E, F, and G. Don’t glue to part D. Use cut nails to secure the frame in place. At the top of the frame, the nails arc driven through part С into the ends of parts M and N.
When you use the hyperlink http://plasmir.ru required.
