Таble Saw Basics. part6
If your fence has a width-of-cut scale, set it by measuring from a right blade tooth to the fence. This scale is a rough guide at best and should not be relied on except for rough work. For critical work (and most of it is) use a good steel rule to measure the exact distance the fence should be set from a tooth on the right side of the blade.
The final operation is to make a ripping cut along the length of a board to reduce it to a specified width. For example, let’s cut an 8 in. or wider board down to 6 in.
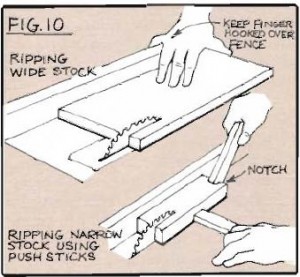
Slide the fence so it’s exactly 6 in. from a blade tooth set to the right and lock the fence in that position. Place the board flat on the table and hold firmly against the fence with the right hand. Switch on the motor and use the right hand to push the piece through the blade (Fig. 10).
Continue pushing evenly until the piece is well past the rear of the blade. When it begins to tilt off the edge of the table, grasp it and lift well up and clear of the blade.
The 6 in. piece you have just cut is about as narrow a piece as you should attempt to cut by hand. Any ripping cuts made with the fence less than 6 in. from the blade should be made using a pushstick instead of your fingers.
Now that your table saw has been adjusted, plan on keeping it that way by periodically going through the checking procedures described here. If you use the machine 10 hours per week, a monthly inspection is not too frequent.
The basic crosscutting and ripping operations outlined are a small part of the very many operations of which the machine is capable. Hopefully, this article will help you to get started with some degree of confidence. The Complete Book of Power Tools by R.j. DeCristoforo has a 74 page section devoted entirely to the table saw and is probably one of the best reference works available for those who wish to use the table saw to its full potential.
When you use the hyperlink http://plasmir.ru required.
