Archive for the ‘Furniture’ Category

Shaker Single-Drawer Cupboard. Part 5.

Воскресенье, 5 февраля, 2012

With the panels cut, the doors can be assembled. Apply glue to the mortises and tenons then assemble as shown. The panels must be free to move with changes in humidity, so be sure not to glue them in place.

The drawer (parts T, U, V, and W) can now be made and assembled as shown. Note that the bottom is made using a 1/2 in. thick solid stock beveled on all four edges.
(далее…)

Shaker Single-Drawer Cupboard. Part 4.

Воскресенье, 5 февраля, 2012

The door stiles (P) and rails (Q) can now be cut to length and width. When cutting the stiles, it’s best to allow at least an extra inch on each end. After the mortises are cut, this extra length can be trimmed off. Use a router with a 3/4 in. piloted round-over bit to cut the bead on all rails and stiles. Note that the cutter depth should be set to establish a 1/16 in. step as shown.
Next, use the table saw to cut the ‘3/4 in. wide by 3/4 in. deep groove that accepts the panel (R).
(далее…)

Shaker Single-Drawer Cupboard. Part 3.

Воскресенье, 5 февраля, 2012

The back boards (parts L) can now be cut to size and rabbeted lengthwise as shown. A pair of cut nails spaced about 2 in. apart are driven into the back edge of parts C, D, and E.

Next, the front frame (parts M, N, and O) is made. The tenons on the bottom end of parts M and N are best cut using the table saw and dado head. Refer to the tenon detail for all dimensions. Once the tenons are cut, lay out and mark the location of the mortises. When making the mortises, you’ll find that most of the waste stock can be removed by cutting a series of holes using a 3/4 in. diameter drill bit. When drilling though, be sure to keep the bit square to the edge so that later, when the frame is assembled, the tenons will fit snugly in the mortises. After the holes are drilled, the remaining waste stock can be cleaned up with a sharp hand chisel.
(далее…)

Shaker Single-Drawer Cupboard. Part 2.

Воскресенье, 5 февраля, 2012

The basic carcase (consisting of parts А, В, C, D, E, F, and G) can now be assembled. Give all parts a thorough sanding, then dry assemble to check for a proper fit up. For the most part, the original piece was assembled with cut nails, a technique that was commonly used. Old-fashioned cut nails can still be purchased today. The Tre-mont Nail Co., Box 111, Warcham, MA 02571 sells what they call a «Fine Finish» nail (no. N-19 standard) that will work well. Order the 4d (1 1/2 in. long) size. To minimize any chance of splitting the wood it’s best to first bore a pilot hole for each nail.
(далее…)

Settle Bench. Part 2.

Воскресенье, 5 февраля, 2012

After the top has been made fasten it securely to the two cross braces (K). Because the fastening system used here must accommodate movement across the width of the top, we have chosen to use screws inserted through the top, countersunk and then plugged. A fixed center screw is inserted to equalize movement, while the outer screw hoies are elongated (slotted) to accommodate this movement. The fastening detail shows a cross section of these slotted screw holes. When elongating the screw holes take care that they are indeed slotted and not merely enlarged, lest the screw shoulder have no surface to bear on.
(далее…)

Settle Bench

Воскресенье, 5 февраля, 2012

The settle bench was a convenient article of furniture in the colonial home, doubling as both a table and bench. This bench, which can be built from either pine or hardwood, is an excellent example of traditional Colonial style craftsmanship. It includes the most desirable settle bench features: the wide pivoting tabic top, and the hinged seat board opening to a storage compartment below.
(далее…)

Shaker Single-Drawer Cupboard

Воскресенье, 5 февраля, 2012


(далее…)

Pivot-top Game/Coffee Table. Part 5.

Воскресенье, 5 февраля, 2012

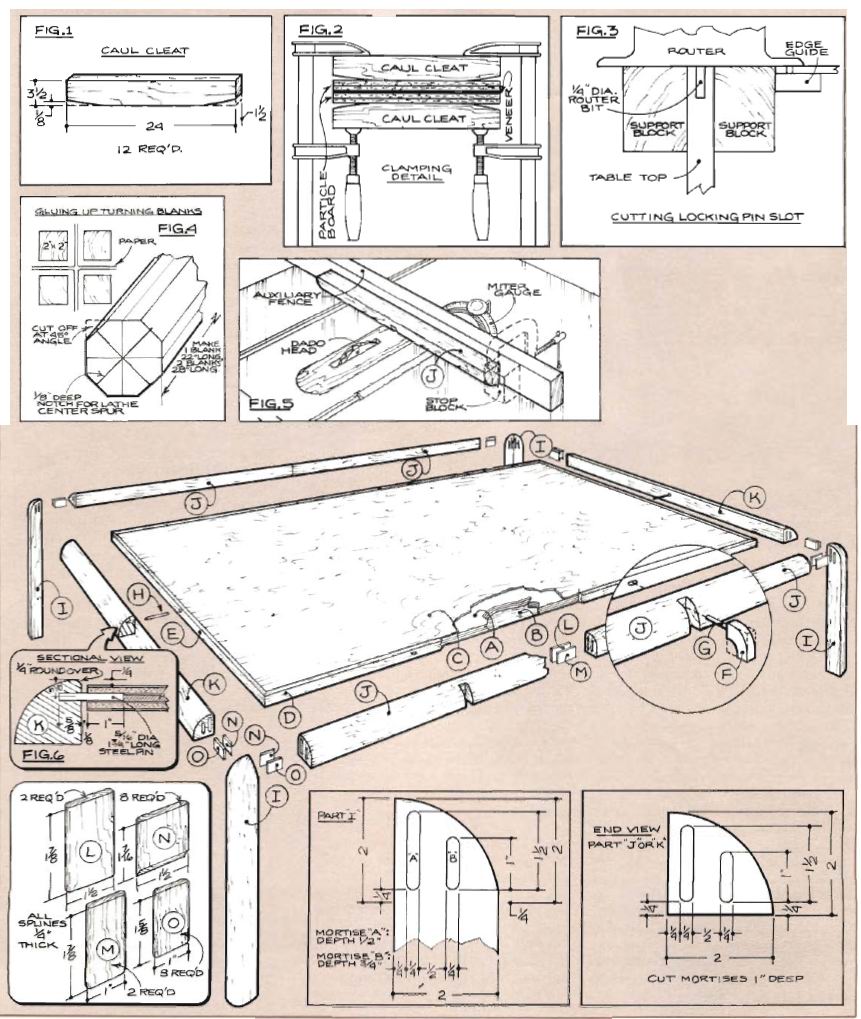
The notch for the locking pin is cut on the side aprons (J) as shown in Fig. 5, then the 5/16 in. diameter hole is bored at a point 5/16 in. from the top edge (Fig. 6). Use the drill press with a stop block to insure that all four holes are in the same location. Also use the same set up to bore the pivot pin hole on the end apron (K).
(далее…)

Pivot-top Game/Coffee Table. Part 4.

Воскресенье, 5 февраля, 2012

The top can now be final sanded, with several coats of Watco Danish Oil applied as a final finish.

All legs and aprons are made on the lathe using a technique called split turning. In short, a split turning consists of stock glued with paper in between to form a blank. After turning, a chisel is used to split the blank apart at the paper seam to produce four duplicate parts.
(далее…)

Pivot-top Game/Coffee Table. Part 3.

Воскресенье, 5 февраля, 2012

Once again, lay two of the particle board pieces on the workbench and cover with wax paper. Place the flattened game board on the wax paper, good side down, then place the plywood on top and align the edges. Now lay the ash veneer (C), good side up, on the plywood, again aligning the edges. Add more wax paper to the top, then use the caul cleats to apply clamp pressure. Apply the center cleat first and work toward each end with the remaining cleats. It’s important to apply pressure to as much of the surface as is possible, so if you have any C-clamps saw can be used to rip the opposite edge. If your table saw can’t crosscut 24 in. wide stock, you’ll need to use the router to make the end cuts.


(далее…)

Pivot-top Game/Coffee Table. Part 2.

Воскресенье, 5 февраля, 2012

Now, lay two of the four particle board pieces on your workbench (with the edges flush) and cover the top piece with wax paper. Note that the «good» side of the game veneer is covered with tape. In order to flatten it, you’ll first need to moisten the opposite or «down» side with a mixture of glycerine (available at any drug store) and water. Mix one part glycerine and two parts water and pour the solution into an old plastic spray bottle (see shop tip on page 51). Spray the «down» side of the veneer so that the entire surface is moistened, but not so much that it becomes soaked. Now place it on the wax paper, cover it with more wax paper and place the remaining two sheets of particle board on top.
(далее…)

Pivot-top Game/Coffee Table

Воскресенье, 5 февраля, 2012

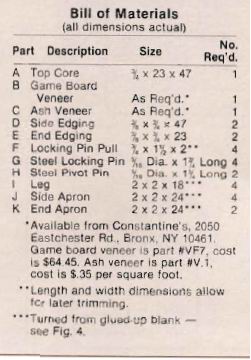
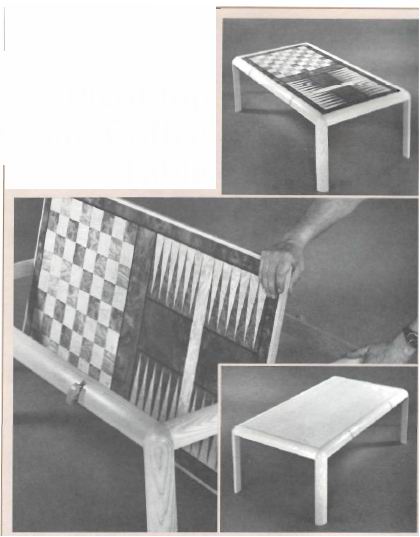
This contemporary game/coffee table is one of the best looking pieces we have seen in a long time. Although we can only describe them to you, the beautiful colors in the contrasting Carpathian elm and white ash burl game board faces (available from Constantine’s; see Bill of Materials) are striking indeed.
The coffee table is unique in that its pivoting top actually makes it two tables in one. The opposite side of the top is a plain ash veneer, also available from Constantine’s. The design of the table incorporates an interesting split-turning technique which will be explained later.
(далее…)