Special Techniques Making the Rule Joint. part 2.
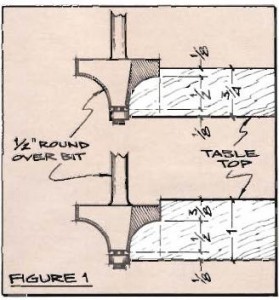
No matter which technique is used, the first and most important step is to correctly lay out the position of the joint. There are two key elements to consider: the hinge location and the coordinates of the radius. The thickness of the stock and the size of the bits or cutters can also be factored in, however for practical purposes we have assumed that the stock thickness will be in the area of 3/4 to 1 in., a range which encompasses the thicknesses of most common table-tops. Although theoretically the bit or cutter is determined by the stock thickness, we have found that matching 1.2i in. cove and round-over bits or cutters can be used to shape a nearly perfect rule joint in stock 3/4 to 1 in. thick. As shown in Fig. 1 the only difference will be a deeper shoulder on the thicker material.
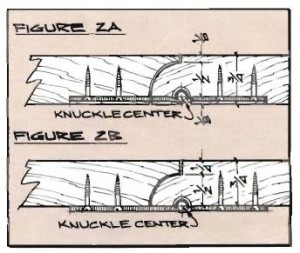
As noted earlier the key elements in making the rule joint work are the hinge location and the position of the radius. If the hinge is to be mortised in place, to accurately lay out its location and the coordinates of the radius, you must first measure the hinge knuckle diameter. By dividing the knuckle diameter in half you can determine the center or pivot point of the hinge. As shown in Figs. 2A and В the pivot point is important because it dictates exactly where the arc of the joint must begin and end.
If the entire hinge is to be mortised (Fig. 2A) then one-half the knuckle diameter is the distance up from the bottom at which the arc begins. If the hinge is to be applied flush (Fig. 2B) with only the knuckle mortised, then the arc simply starts flush at the bottom. Given the same thickness material and the same size bits or cutters, the only variation in the two joints will be the depth of the shoulder.
When you use the hyperlink http://plasmir.ru required.

