Special Techniques Making the Rule Joint. part 3.
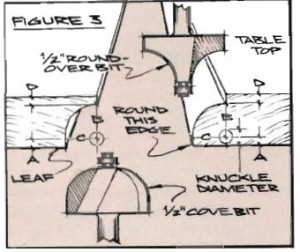
Fig. 3 shows a basic formula for locating and cutting a typical rule joint when the hinges are to be mortised in place, as they usually are. Distance A is one-half the knuckle diameter. Distances В and С are the radii of the joint and are, of course, equal to the bit or cutter size, which we have set at a constant 1/2; in. Distance D is the shoulder depth and corresponding lip thickness, which should not be less than 1/2, in. The critical point to know in all this technical talk is this: for the rule joint to open and close smoothly the center or pivot point of the hinge knuckle should be located near the intersecting point of radius lines В and C. In actual practice, when mounting the hinge it helps to cheat a little and install the knuckle a hair (‘/2 in.) toward the leaf side of the joint.
Most experts specify matching bits or cutters for fashioning the rule joint. However the joint works best if the round-over on the tabletop is a tad less than the corresponding cove cut on the leaves. By using the cove bit or cutter to shape a short length of scrapwood and then gluing medium grit sandpaper along the arc, you will have a perfect sanding block with which to reduce the round-over by about 1/2 in. You may also wish to soften the lower edge of the tabletop (Fig. 3) to avoid tearing along this edge should the joint bind. If, in spite of all these considerations, the joint still binds or catches when mounting the hinges, position the table leaves so that a little space (about 1/2 in.) remains between the leaves and top along the full length of the joint.
Because the fit of the rule joint can be so critical, and given the fact that a considerable quantity of stock could be wasted should there be a serious problem with the joint, the best way to insure success is to make a sample joint and have a test fitting. With several short lengths of stock the same thickness that you will use for the top and leaves, lay out and cut the rule joint on these test pieces. Mount the hinges exactly as you would on the finished table and check that the joint opens and closes smoothly without catching or binding. If there is a problem make the necessary adjustments before actually cutting the joint on the finished top and leaves.
When you use the hyperlink http://plasmir.ru required.
